Friday, September 23, 2011
Thursday, September 15, 2011
Barcade Philadelphia
Was looking around for any arcade happenings in Philadelphia area and stumbled upon this:
http://www.avclub.com/philadelphia/articles/barcade-actually-really-truly-opening-soon-serious,60633/
Apparently someone has actually decided to do something that I wanted to for years but lacked the resources to do.
Hey Scott, I'll build the controllers, just let me be a part of this sweet shit...
http://www.avclub.com/philadelphia/articles/barcade-actually-really-truly-opening-soon-serious,60633/
Apparently someone has actually decided to do something that I wanted to for years but lacked the resources to do.
Hey Scott, I'll build the controllers, just let me be a part of this sweet shit...
Thursday, September 8, 2011
MAME4Droid Available!!!
Just found out about MAME4Droid and it is free...
Will definitely be loading that up and seeing how is compares to Jrioni Arcade (Jarcade).
http://code.google.com/p/imame4all/
Will definitely be loading that up and seeing how is compares to Jrioni Arcade (Jarcade).
http://code.google.com/p/imame4all/
Tuesday, September 6, 2011
G -Tablet MAME Demo using Jarcade and USB Custom Control Panel
Here is a quick video demo of Neo-geo's Base Ball Stars 2 on my Viewsonic G-Tablet (rooted, running Vegan-TAB v.7.0.0) and Jarcade v.3.0.0 (I have since upgraded to latest Jarcade).
I then connected my custom MAME control panel via the G-Tablet's USB port (since it is a "keyboard" device) and was able to use it to play MAME games on the Tablet... this is the iCADE killer! (Costs half as much as iPad setup).
I then connected my custom MAME control panel via the G-Tablet's USB port (since it is a "keyboard" device) and was able to use it to play MAME games on the Tablet... this is the iCADE killer! (Costs half as much as iPad setup).
MAME Control Panel
So a few months back, I finally decided to build my own MAME machine with an authentic, custom control panel. The debate was whether to go big like the old school cabs or go more modern a la the "nanocade" project.
Either way, I knew that I would need a proper control panel, so I decided to tackle that first; I wanted to use exactly what is found on arcade units, so I went with Happ brand. I bought a bunch of cherry micro-switch pushbuttons and competition joysticks, as well as some USB-based, i-PAC2 controller interface units, and threw together a quick-n-dirty single player controller.
Happ Joysticks and Pushbuttons: http://na.suzohapp.com
i-PAC2: http://www.ultimarc.com/ipac1.html
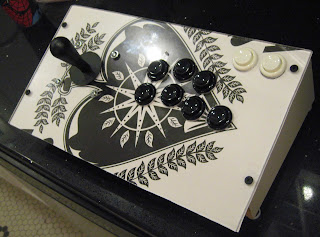
To keep it simple, I bought some lexan scrap from a local plastic-fab store and designed a layout-template using Solidworks. I printed out the template and used it to position my drill, and used a 1-1/4" hole saw bit for the pushbutton holes and a 1-1/8" hole saw bit for the joystick hole. (Make sure you use slow speed when cutting the lexan or else it tends to crack.) I wanted the controller angled, so I used some left over particle board shelving and put the panel on a 15-20 degree slope.
Figure 1: Top view of Controller,
arc layout with 4-button setup on bottom for neo-geo games
the graphic inlay is actually a novelty playing card of 'Ace of Spades' that i bought at Party City
Figure 2: Bottom side (before mounting lexan shield to underside) depicting wiring
Figure 3: i-PAC2 control interface (screw-mounted/ rubber washers for height)
Figure 4: Test set-up with laptop running Model 2 emulator with Virtua Fighter 2
Subscribe to:
Comments (Atom)


