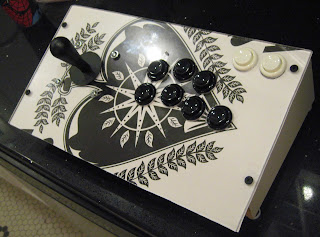
Either way, I knew that I would need a proper control panel, so I decided to tackle that first; I wanted to use exactly what is found on arcade units, so I went with Happ brand. I bought a bunch of cherry micro-switch pushbuttons and competition joysticks, as well as some USB-based, i-PAC2 controller interface units, and threw together a quick-n-dirty single player controller.
Happ Joysticks and Pushbuttons: http://na.suzohapp.com
i-PAC2: http://www.ultimarc.com/ipac1.html
To keep it simple, I bought some lexan scrap from a local plastic-fab store and designed a layout-template using Solidworks. I printed out the template and used it to position my drill, and used a 1-1/4" hole saw bit for the pushbutton holes and a 1-1/8" hole saw bit for the joystick hole. (Make sure you use slow speed when cutting the lexan or else it tends to crack.) I wanted the controller angled, so I used some left over particle board shelving and put the panel on a 15-20 degree slope.
Figure 1: Top view of Controller,
arc layout with 4-button setup on bottom for neo-geo games
the graphic inlay is actually a novelty playing card of 'Ace of Spades' that i bought at Party City
Figure 2: Bottom side (before mounting lexan shield to underside) depicting wiring
Figure 3: i-PAC2 control interface (screw-mounted/ rubber washers for height)
Figure 4: Test set-up with laptop running Model 2 emulator with Virtua Fighter 2


No comments:
Post a Comment